Tuesday, April 26, 2011

Glitter Among the Grit


Drawing with fine point Sharpie and watercolor. Different from anything I have ever done. I saw an image in a magazine of an old woman and decided to use the light box to trace it.

Thursday, April 7, 2011

Weaving and Eleanor Roosevelt


These are both pieces that I did a while back. The top piece is a weaving project that our teacher assigned. I added spray adhesive in hopes of sealing the project but it went terribly wrong and the pieces ended up all tangled and tattered. It took me over 2 weeks to weave all of the tiny strips of paper together, and it was ruined! Oh well, the other piece is an incremental gradient portrait of Eleanor Roosevelt. Again, it took me a pretty long time to do. I am not crazy about either of these pieces, but I figured that I would upload them anyway.

Wednesday, March 16, 2011

'Ma' Inspired by Grapes of Wrath by John Steinbeck


I really like the results of my first use of resin on top of my mixed media piece. I was using vintage laces as well as threads and even an old brooch and I really wanted to capture and compliment the texture of these objects and materials. I wanted to try an alternative to encaustic and I really like the results. I have to say, this is probably one of my favorites so far. I will use this as a concentration piece. I also chose to use resin rather than encaustic because the encaustic technique tends to cover up a lot of the texture in lace and fabrics. Rather than cover it up, I wanted to accentuate the fabrics, as they represented Ma, the inspiration for this piece.

Wednesday, February 16, 2011

Grenouille


This piece was inspired by a novel I was reading entitle Perfume. I used lots and lots of layers of found papers, thread, and encaustic wax. I think this will be one of my concentration pieces. I felt like it was missing something but I was unsure of how to improve it. Any suggestions?


This piece is done on a small canvas with acrylic paint. I wanted to do something abstract that was still 'my style'. I intend to use this piece for breadth in my portfolio. I really like the colors and I'm glad that Mr. Brandt pushed me to create variety by adding found objects. It definitely adds to the piece and gives it more depth. The found objects I used included gauze and strips of paper.

Sunday, January 2, 2011

Quill Me Now


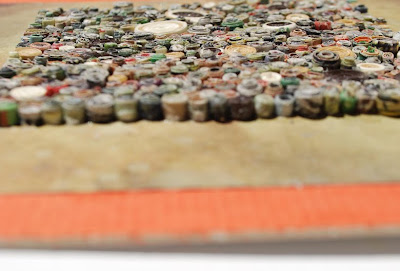
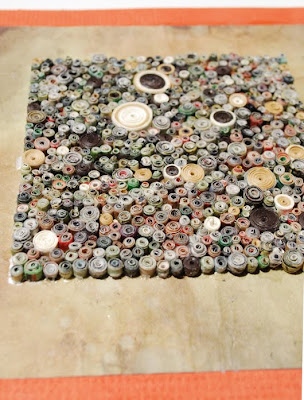
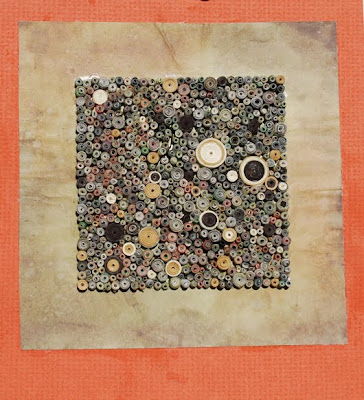
This is my first quilling piece. It took me so long that I'm not sure if there will be another quilling piece. Let me put it into perspective: The quilled square is about 4 inches by 4 inches. There are approximately 40 quills per square inch. Each quill takes roughly two minutes to make. So, do the math- thats a LONG time. Quilling is a technique that I have been researching for a while and I finally decided to try it. Basically, using a quilling tool, you wrap a thin piece of paper around the quilling tool to make a coil. After this step, you can choose to release the coil as much or as little as you choose. I didn't release the coils at all, so they are very tightly wound. Once you have reached the end of the paper strip, just seal the coil with adhesive (I used Elmers). To get a perfect square shape, I made a square matboard template and placed and glued the coils inside. After I was finished, I removed the template. I really like the finished product. But, as you can see by its title, 'Quill Me Now', it was really tedious and I'm not sure that I would duplicate this willingly.

Thursday, December 2, 2010

Altered Book


Another altered book entry with the usual materials. It is not done because I still need to add some found images and a focal point.

Thursday, October 21, 2010

"Glory" Altered Book


I used the same technique that I have been using with creating a background out of paint and outlining the organic shapes. After that, I practiced the weaving technique with different found papers and threads. I also painted a simple bird and used a button to create an eye. Its not my favorite, but I think that it was good practice with the weaving technique.

"Blinded" Altered Book


Yet another unfinished piece... I started creating a background with assorted paint and stamps. Then I couldn't decide if it was TOO busy and was hesitant to continue. I outlined several of the shapes with a Sharpie marker. I also used the Sharpie to write in different layers of the paint. Will post more pictures at a later date.

"Reflections" Altered Book


As you may be able to tell, this entry is not yet finished. I still haven't found the perfect image to feature. Thus far, I used paint, wax, wax paper, thread, found papers, lace, and a Sharpie marker. I used the same technique that I have used in previous altered book entries. Because the prompt was "Reflections" I painted both pages and then closed the book pressing the pages together. Then, I reopened it and the paint had created a mirror image of each page. After this, I continued doctoring the piece and making the paint look how I wanted to. I had trouble with getting the intensity of the colors to match what I visualized them to be. As I finish this, I will post more pictures.

"Redemption" Altered Book


This altered book entry is one of my favorite so far. I really REALLY like it. I was inspired by the Johnny Cash album "Unearthed" because one of the tracks is "Redemption." The actual album is picture above. I wanted to create a reel of photos and a simple title underneath them, like the format of his album cover. After deciding my layout, I focused on color scheme and embellishing the piece. I used paint, wax, wax paper, thread, corrugated cardboard, found papers and found objects. I think that this is a good entry because of how detailed it is and how many layers there are. Because I created it, I recognize each layer individually. I also traced over the natural shapes within the paint and image, creating a contour line with a deep red Sharpie marker. I think that this piece was a success.

"Down the Drain" Altered Book


As my second altered book entry, I continued to experiment with style and technique as well as materials. The prompt was "Down the Drain" for which I wrote a limerick... "Up in smoke, down the drain, the cookie crumbles all the same." From this, I had inspiration for my piece. I used a light blue color scheme to represent water (from the drain) and added water to the paint so that it would drip and spread more fluidly. I also drew a very wavy, fluid pattern that represented water. Next, I represented smoke by the picture of the two old women smoking. I also continued drawing the pattern coming out of their cigarettes. I also had an image of the eiffel tower and I drew smoke coming out of it as if it was a chimney. I also outlined quite a few of the natural shapes that the paint made with a sharpie. I love highlighting this organic element of the composition. I think this was yet another success.

"Making Time" Altered Book


The green page is the contents page of my altered book that I used acrylic paint to create. The next several images of the green/orange pages are my first altered book entry. The prompt was "Making Time." As a mixed media piece, I explored my style, taking a risk. I really love how this turned out. I used paint, wax, thread, chipboard, sharpie, wax paper and other found materials. The images that I drew with the sharpie represent constallations that are believed to tell time. I was really proud of how this piece turned out and I think that I will definitely be creating several more formal pieces within this style.

Tuesday, October 19, 2010

Image Transfer with Texture


Step 1: Create a background using texture paste that I mixed with acrylic paint. The three colors I used were a light yellow, light blue, and salmon. I really liked the texture in the background. It reminded me of weathered furniture or chipping paint on wood. I really like that look and it reminds me of one of my favorite interior design styles. Step 2: Take a picture using a Nikon camera and a model. Print image with laser jet printer and carefully create image transfer on textured surface. Step 3: Continue adding the tinted texture paste on top of and around the image transfer. Step 4: Embellish the piece with thread, pins, buttons, corrugated cardboard, found papers and found objects. I think this piece was my biggest success thus far. However, I really don't like it because I wanted to make the image transfer become a fluid part of the piece and I feel like I failed at that. Comments?

India Ink


The assignment for this piece was to create a background using found papers, lightly gesso that background and then use india ink to draw a 'quick, sketchy' image on the background. I really despise the whole 'quick,sketchy' thing. I think that it makes the pieces look sloppy and I am not very good at 'letting loose.' It involved taking a risk and I was uncomfortable with the medium and the technique, which made the risk all the harder to take. I like the background in which I used newspaper and assorted colors of tissue paper. I do not like the image that is on top... It is supposed to be a canister full of dirty paintbrushes of all different sizes. I used parafin wax to seal the entire thing. In my opinion, not a success.

Erasure Drawing


The erasure technique consists of drawing a composition, erasing it, and then re-drawing the image in a slightly different position so that it looks as if the image is moving... I wasn't a huge fan of this technique when it was introduced. I thought that it would just look like poor craftsmanship to have erased lines all over the paper. I used different drawing pencils to shade and decided that the model hand would be the "moving object." I used the sign language hand gesture for 'I love you.' This gesture has a special meaning to me and I like that it was incorporated in my piece. However, I wish that I would have spent more time making the erasure technique more evident. It is rather subtle. This piece is decent, but I don't prefer drawing and I think that I am better at design.